

Why is Axle Triangulation Important?
Axle triangulation determines whether your trailer or caravan wheels are correctly aligned. Whether you’re towing a caravan, boat trailer, horse float, etc., all trailer wheels should run straight without tyre scrubbing.
This article will consider two types of trailer/caravan wheel alignment:
- Single Beam Axle
- Independent Coil Suspension
How do you know if your trailer axle is out of alignment?
While this can identified at your next service, there are warning signs to look out for. Improper alignment often manifests in increased tyre wear and/or poor towing.
Triangulation can also become out of proportion due to damage to the chassis and/or axle. Bent axles, especially, can exacerbate this issue.
If you experience abnormal towing or are aware of trailer chassis/axle damage, Couplemate™ recommends taking your trailer or caravan in for a service and asking for a wheel alignment assessment.
Does tyre scrub always indicate misalignment?
While tyre scrub is a common symptom of misalignment, it is also a symptom of other common issues.
Tyre scrub can manifest as either Toe-In or Toe-Out. Couplemate™ has often found that the latter occurs when the trailer is overloaded, causing tyres to toe-out. This action causes wear on the inside of the tyre.
Therein, rather than misalignment, tyre scrub could be a result of an over-weight trailer. So, what do you do?
Before going in for a service, our best advice is to take your trailer or caravan over a local weigh bridge and get a weight certificate. This will rule out one possibility when addressing abnormal towing issues, and potentially save yourself time and money if this is the core issue.
Correcting Misaligned Beam Axles
Single beam axles with misaligned wheels are relatively easy to correct.
This procedures relies on accurate measurements, so ensure an adequate measuring tool is used. Couplemate™ recommends using stiff measuring tape.
Instructions: Refer to Figure 1
- Measure distances L and M.
- i.e. Measure from the centre of the coupling to the tip of the axle.
- Manoeuvre the Axle so that the distance between M and L is equal.
- If these measurements are not equal, your axle is misaligned.
- If the Axle is poorly aligned, replace the axle pad with a short shackle plate i. Place one hole over the spring centre and slide the Axle over the shackle plate, backwards or forwards, until M and L are equal.
- Install the u-bolt to apply a small amount of pressure to the Axle during alignment.
- When M and L are equal, tighten the u-bolts.
- Finally, weld the shackle plate to prevent axle movement during braking events.
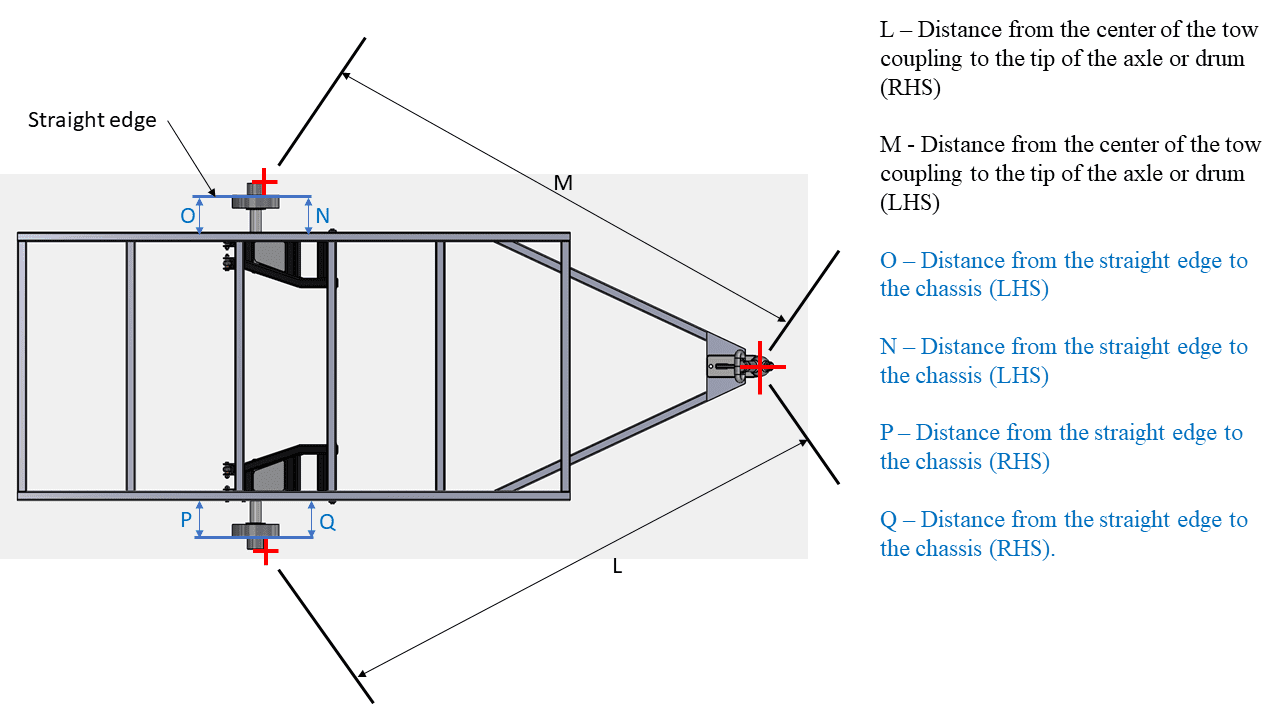
Figure 1
Chassis Measurements
Refer to the figures below:
- Measure distances L and M to obtain the distance from the centre of the coupling to the tip of the Axle or drum. This measurement must be accurate – ensure no sag in the tape measure, and do not use elastic string. Maneuver the independent suspension such that distance M is with 4mm of distance L.
- Place a straight edge along the face of the drum/brake. This straight edge should be at least 1m long.
- Measure distance O and N. Manoeuvre the independent suspension frames such that O and N are within 1mm of each other. Do the same with measurements P and Q.
- When setting the toe-in. Refer to figure 2. Using the straight edges, measure distance R and S. Manoeuvre the independent suspensions such that distance S is 3mm shorter than distance R. During this process, both the independent suspensions should be moved the same amount to achieve the 3mm difference.
- This ensures the toe-in is set equally on both the left and right sides.
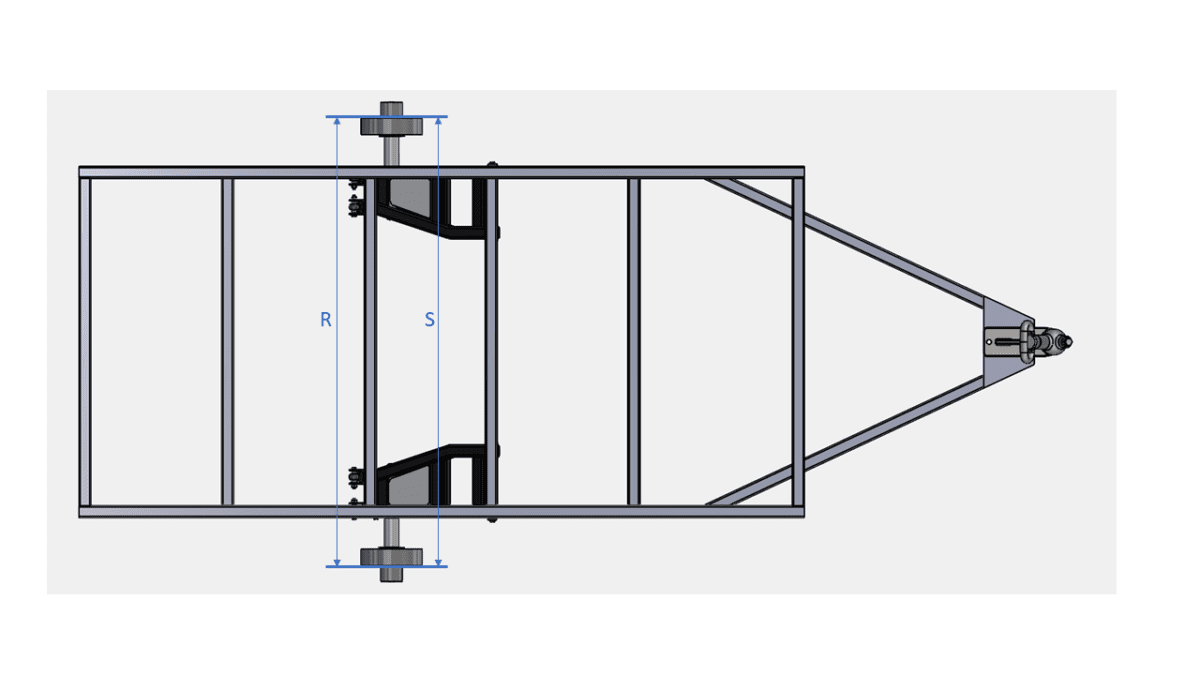
Figure 2
Triangulation on Independent Coil Suspension
This installation or triangulation procedure only applies to the Couplemate™ Independent Coil Suspension.
- Set guards at a minimum of 110mm above the tyre.
- Max compression is 70mm with 35mm shock loading.
- The measurement from the top of the frame to the centre stub is 297mm.
- Top frame measurements include a shock absorber and mount brackets – 612mm x 300mm.
- Bottom frame measurements include shock absorber mount brackets – 572mm x 300mm.
- The centre of the stub with the top frame measures 441mm from the front of the structure giving you 171mm.
- From stub centre to rear of the top frame.
- Suspension travel to full bump 70mm.
- for every 30kg, spring compresses 1mm, or every 1kg equals 0.333mm
- height of the suspension, from the ground to the underside of the chassis rail, would be half the diameter of your tyre (the stub centre) plus the measurement from stub to top frame 297mm. Therefore if you have 265/70/16” wheels, the diameter is 777mm, and your chassis will sit at 389mm plus 297mm, which equals 586mm.
- When installing these frames to your chassis, it is essential to set these up correctly so that the frames are square with your chassis, with each other and that they toe in by 3mm.
Axle Triangulation: Leave a Comment Below
0 Comments